
Drawing fundamentals make every other art technique easier to pick up. Because shape recognition, line control, and proportion work help you draw what you see rather than what you think you see.
Most aspiring artists skip these basics and go straight to detailed portraits or landscapes. And when their drawings look off, they underestimate their talent. But the real issue is how they never learned to break down what they’re looking at or control where their lines go.
In this article, we’ll show you the five shapes that simplify any drawing subject. You’ll also learn effective mark-making exercises that fix shaky lines, and how to use reference photos without copying them line-for-line.
Let’s begin with understanding different shapes and forms.
Drawing Fundamentals: The Core Skills Behind Every Style
Every drawing style is built on the same foundational skills. That’s why drawing fundamentals are the basic techniques that all artists need to start with. It gives you the control and confidence to develop any artistic style you choose.
Take a look at why basic shapes should be the first step.
How Simple Forms Make Complex Subjects Manageable

Breaking subjects into basic shapes lets you check proportions before adding details or shading. Say, your brain sees a car or face as one complete thing, but artists train themselves to see circles, rectangles, and cylinders instead.
With practice, you’ll start to think that you’re not drawing a nose, you’re drawing a wedge shape. Or you’re not drawing an arm, but drawing a cylinder that bends. This single approach works for still life, figure drawing, architecture, and everything in between.
We’ve also noticed at our hands-on teaching classes that students who practice this method improve faster than those who try to draw complete objects right away. Basically, the shapes give you a roadmap to follow instead of wondering where everything goes.
The Five Basic Shapes You’ll Draw Again and Again
What if every subject you wanted to draw was just a combination of five shapes? These basic forms are circles, squares, triangles, spheres, and cylinders. They can break down any complicated subject into pieces you can draw. For example, a head is an oval, a torso is a rectangle, and arms are cylinders (once you see it, you can’t unsee it).
So practice sketching these shapes at different angles to understand how perspective changes their appearance. You’ll realize how a circle becomes an oval when you tilt it. Or the way a square becomes a trapezoid.
Drawing Basic Shapes With a Light Touch
Drawing with light strokes saves you hours of frustration because you can adjust and refine without fighting against heavy, permanent marks. On the other hand, if you press too hard and realize the proportions are wrong, you’re stuck trying to erase lines that ruin the paper.
Pro Tip: Hold your pencil farther back and work on an upright surface for better control and lighter pressure. This gives you the freedom to experiment and make mistakes without consequences. The early lines are just guides, not the final drawing.
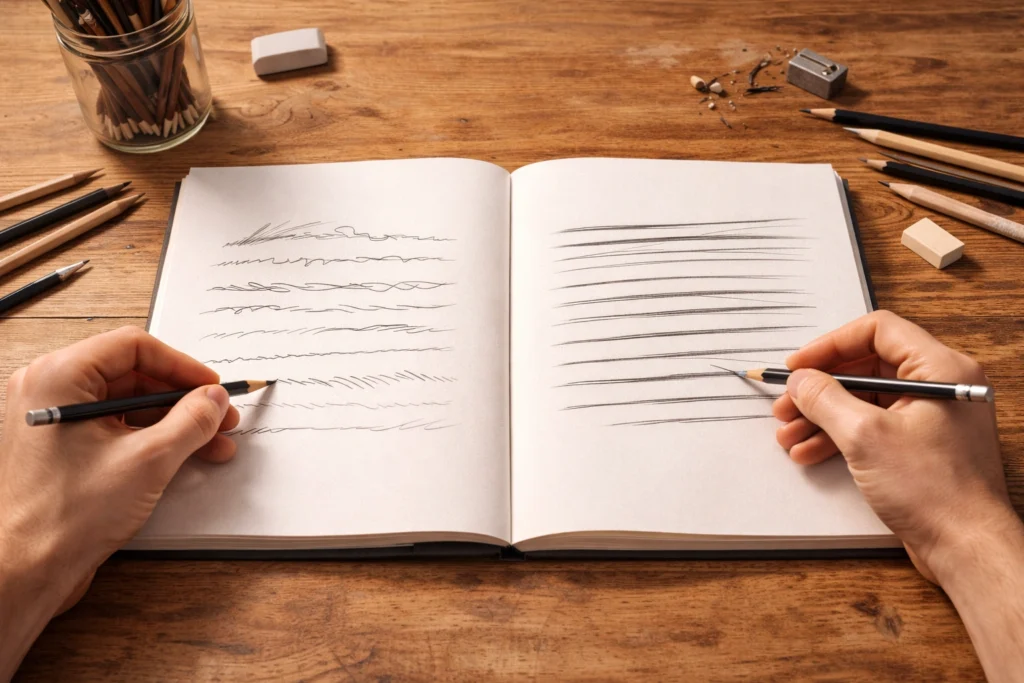
Mark Making and Warm Ups That Build Muscle Memory
Your drawings are only as confident as the marks you make. The truth is, shaky, scratchy lines create shaky, scratchy art. However, you can train your hand to make cleaner, more controlled lines through focused practice.
Below are some mark-making exercises that fix those wobbly strokes.
Mark Making Exercises for Confident Lines
Every line you draw either improves your piece or pulls it away from your vision. There’s no neutral ground here. From our experience at workshops, we’ve seen how beautiful marks create clean drawings while scratchy marks make messy results.
Chris Legaspi also emphasizes this in his teaching, and it changed how we approach drawing fundamentals. Here are the steps he taught:
- Practice drawing straight lines, curves, and loops repeatedly to train your hand-eye coordination
- Start with 20 lines across a page, and try to make each one smooth and deliberate
- Then move to circles, spirals, and figure eights
The exercise sounds tedious, we know. But spending 10 minutes on this daily builds the muscle memory that reflects in everything you draw later.
Practical Daily Warm-Ups for Aspiring Artists
Research on motor skill development shows that shorter, more frequent practice sessions lead to better results.
Just five minutes of circles, figure eights, and hatching before you start prevents stiff, awkward drawings. These warm-ups prime your muscle memory the same way stretching prepares you for running. If you skip them, your first 20 minutes of drawing will likely feel clunky until your hand “wakes up.”
Quick Tip: Keep a separate sketchbook just for warm-ups so you’re not pressured to make perfect art. This removes the mental block of “ruining” a nice page and lets you practice freely.
How to Fix Shaky, Timid Strokes
Shaky lines come from drawing slowly and tensing up. The only way to solve this is to draw faster with your whole arm, not just your wrist. This might feel wrong at first because you think slower equals more control. But your confidence shows up in the linework.
In fact, viewers notice timid marks even if they can’t explain why your drawing feels off. That’s why it’s much better to accept that some lines will require redrawing instead of trying to make every stroke perfect. Not to mention, professional artists draw multiple lines to find the right one, then darken their choice.
Working With Reference Photos and Real-World Observation
Most beginners just grab a reference photo and try to copy it line-for-line. However, that’s where the real problems start, because copying doesn’t teach you anything about the drawing process.
Take a look at how to use references the right way.
When to Use Reference Photos and When to Avoid Them
Beginners often rely too heavily on reference images and never learn to visualize forms or understand three-dimensional structure. And frankly, references help with poses, lighting, and details that you can’t invent, but simply copying photos won’t teach you to draw. You’re just tracing shapes without understanding why they work.
Instead, you need to use a reference photo as a guide for accuracy. If you can’t draw something without looking, that means you haven’t learned it yet. The goal is to understand the forms, proportions, and relationships well enough to draw similar subjects later without help.
How to Copy vs. Learn From References
Copying is tracing or matching exactly. But learning is asking why the artist made specific choices with shape and value. So study how professional artists simplify details, arrange compositions, and handle edges in their work. Also, notice what they leave out just as much as what they include (every mark in a good drawing has a purpose).
After studying a reference, close it and draw from memory to see what stuck in your understanding. This reveals what you learned versus what you just copied. It might be uncomfortable at first, but it’s how you truly progress.
Training Your Eye to See Proportions
Your brain lies about proportions because it knows what things should look like, not what they truly look like. That’s why beginners draw heads too small or hands too tiny.
For this problem, measuring techniques like sighting with your pencil or comparing heights help you see actual relationships between objects. You basically hold your pencil at arm’s length, close one eye, and measure how tall something is. Then compare that measurement to other parts of your subject.
Good to Know: Squinting at your subject or reference blurs details and reveals the central shapes and value patterns. This helps you focus on what’s important instead of getting lost in tiny details too early in your drawing process.

How to Study Anatomy Without Memorizing Every Muscle
You don’t need to memorize hundreds of muscles to draw people well. Just learn the major landmarks that you often illustrate in your drawings (and no, you don’t need to remember “sternocleidomastoid”).
At first, focus on only what’s visible, and your figure drawings will improve faster. To give you an idea, collarbones, elbows, and ribcages that show through the skin. These are the forms that create the surface shapes you see when drawing the human figure.
Understanding simplified anatomy prevents weird proportions like too-long arms or flat torsos in figure drawings. When you know a forearm is roughly the same length as an upper arm, you stop making one twice as long as the other.
So observe how the shoulder has a ball-and-socket joint that creates a rounded form, or how the ribcage creates an egg shape for the torso.
Build Your Drawing Skills with the Basics
Drawing fundamentals like basic shapes, confident mark making, smart reference use, and simplified anatomy are the building blocks that support every other art skill you’ll learn. These are the foundations that aspiring artists need before moving to advanced work.
So start practicing these techniques today, even if it’s just five minutes of warm-ups or sketching shapes around your house. These skills build on each other over time. Every practice session will make the next one easier, and before you know it, you’ll notice real progress in your drawings.
If you want structured guidance, The Heart Project offers beginner drawing courses that walk you through these fundamentals at your own pace. Our workshops give you the support and feedback that makes learning effective and long-term.
Leave a Reply